Welcome to Part 2 of my Light Source Basics Series.
In the last post I defined some basic terms and challenged you to break down your images into simple shapes. If you’re just joining in here, each post is going to build upon the last one so hop back and give a read then come on back.
Starting Small
For these very basic tutorials I am going to be talking about Linear Linear light, the most common and basic light source. Its the kind of light you get when you’re outside, it comes evenly from a single direction so is easy to work with. We’re also going to start with simple shapes so you can try your hand at coloring them before taking them to more complex objects. If you’ve been coloring for a while this is still good practice and gives you things to learn that you may not realize.
Visualizing Light Source
Like I mentioned earlier, Linear Light is a basic light source that comes evenly from a single direction. This is really easy to work with because it takes away the variables like you would get with your light coming from a source like a candle (Radial) or something like a spotlight (Single Point).
For Linear Light, a basic rule of thumb is “if the light source is on the left, the shadows are on the right.” Following that example, highlights would be on the left, midtone in the center and shadows on the right. If the light were to swing to the opposite side, that would all be reversed. The decision get more complex as the object does but its a good rule to keep in mind.
Below I have a light guide for you to download (right click -> Save As). To use this, print it on a transparency or use it to trace lines on a sheet of acetate/clear plastic that you have lying about.

Next download this image (right click -> Save As), it is many of the basic shapes you’ll run across when coloring. You’ll find a ton of spheres (not circles! we’re thinking 3D) out there, and more oval shaped spheres, and cylinders especially. Print this out as well.

Remember the terms we defined last time? Its time to use those to choose colors to give you some practice coloring these basic shapes. With alcohol markers, a basic 3 color blend coordinates with the Highlight/Midtone/Shadow terms we talked about, a light, medium and dark color respectively. Start by choosing a 3 color blend that works for you to practice with (for example: YG01, YG03, YG07).
Using the Light Guide
Now that you have all of these in hand its time to put them to use.
Place your light guide (Printed or drawn side down) on top of your printed shapes. The angle that you turn your guide to is the direction your light is coming from. Here’s my example:
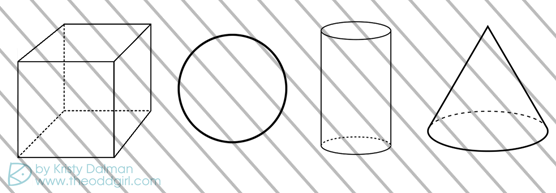
dotted lines are to represent that the object is 3 dimensional, and are on the back of the shape
Imagine that the lines represent sunbeams and they are shining down on our shapes. The surface(s) that the lines touch first note our areas of Highlight (light); where the lines exit the shape shows our Shadow (dark) areas; the areas between are your Midtone (medium).
You have to keep the shape of the object in mind for this, how the light lands and looks on the top of the flat cube will look different than when it hits the rounded surface of the sphere.
Something to work on
Take the tools I have given you today and practice coloring the Basic Shapes.
A good way to practice is to choose 2 colors, 1 to represent Highlight, and 1 Shadow, then while your guide is over your printed image color the areas right on your Linear Light Guide, the area with no color represents your Midtone. Next, take the guide away and color the image with your 3 color blending group. You can lay the guide back on top at any time to check your work.
*Try turning your guide and practicing coloring your shapes from different light source angles*
If you’re unsure how the light might hit on any shape a desk lamp, shape from around the house (box, ball, soup can, funnel or paper cone) and a bit of observation will give you all the information you could want. 🙂






Kim Keen says:
Thanks Kristy, this is fantastic, I so want to use my copics and now I’m learning . YEAH for you and me.
Edna says:
Great tutorial, helped me so much. Thank you for sharing your time and craft colir knowledge.
Create Hugs