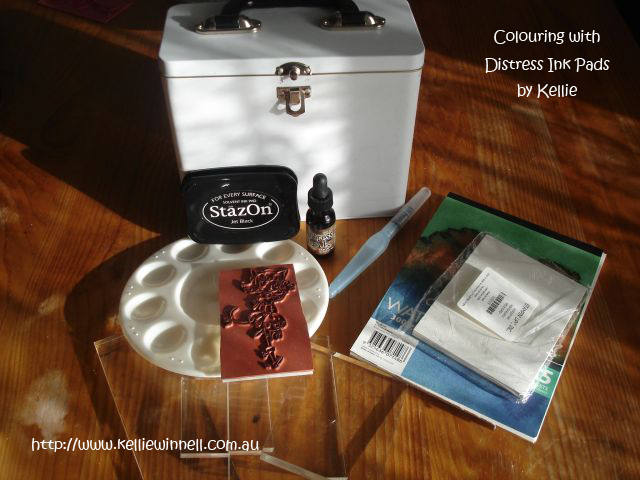

***My first photo is a photo of everything I would need to water colour with distress inks :
- my acrylic blocks that I try and wash once a week as I use double sided tape for un-mounted stamps if I am out of ezy mount and they can get rather sticky
- I then have my tin full of my distress inks
- my stamp & StazOn ink pad
- my aqua painter, these come in 3 sizes and I mainly use the fine point and medium, in this tutorial I used medium tip
- my Lil Lolita Evie stamp that I had already stamped hence her still having ink
- my water colour paper (Stampin’ Up!)
- I have my ink pallet that I picked up at a cheap craft store
- and then of course the one re-inker I don’t have in an ink pad form, don’t know why, just one of those things…

So then we have the stamped image onto the water colour paper and using my acrylic block and stazon ink.


Lightly coloured all over…

.. gone over a second time on face a tad darker …

… added shading around the edges of image to give depth.


First of I go light over them in watered down Broken China…

… then I go over the eyes lightly and watered down with Weathered Wood…


As you can see from above I start at the base to give that depth right away with darker shades I feel this is easier.


Now she needs a pretty pink dress. And I am going to give her a light pink dress with darker pink little kittens. First once again like the skin tones I start of with the lightest colour of Spun Sugar and colour all over and then going back to give a little more depth.

***And then I get my Distress Victorian Velvet also a new colour and give it some more depth in the places I require and then the places that don’t will still have the light Spun Sugar and then giving a all over effect. So as you can see below you can already see the effect taking place….


Once they dry I then go over them with my aqua painter to move the ink just a little. I find that when the ink dries and you then colour over you only move a little of the ink and that is perfect for that light looking shade as you can see above.

And then here is a card with her all coloured and looking fabulous…

Thank you for taking the time to read and look through my tutorial. I hope that it has taught you something new, or just inspired you to give water colouring a try.


Maria Therese says:
Fab tut!!
Brenda says:
Great tutorial.
petraso says:
Great tutorial! This way too coloring is one of the most common in sweden!
ja Love to play with the distress pads and use the refills to coloring but í´m not so good as you!
Eulalia from Italy says:
Great tutorial, great card, great odd girl!!!
I’m inspired by your amazing work. Thank you for your sharing.
xoxoxo Eulalia from Italy
Kellie's Watercolouring Tutorial | www.mawir.net says:
[…] here: Kellie's Watercolouring Tutorial This entry was posted in Uncategorized and tagged awesome, awesome-girl, birthday, […]
Pat R says:
That was an awesome tutorial! Thank you Kellie! I only have a few distress inks, but I am so going to have to try this! I just got into Copics, so I have stamps to play with. Have you ever tried printing digis on the watercolor paper? Does that work? Just curious, as I have an ever-growing collection of Kristy’s digis.
Wendi R says:
oh wow that tut was great!!!! I LOVED the step by step and learned sooo much!!!!
Denise says:
Wow, I am so loving seeing all these great projects! It has my head spinning with ideas! Thank you sooo much!!
Crafty Hugs,
Denise
Diana Fisher says:
This is great! Love the step-by-step!
Annie says:
Omg…such a great technique! I love using water color but never tried the aqua pen with distress inks…I need to go and try it myself now! Thanks for sharing…love the card and color combos 😀
Lucianna says:
What a fun tutorial, I will have to try this! Thank you and beautiful coloring 🙂
Corry says:
I struggle with distess, but now i have that funky holder for the refills too, so maybe I’ll have better luck. It’s gotta be the ink holder right!?!? lol Thanks for sharing Kellie. I love your creation! Old or not ! It’s still great!
Some Different Stamp Storage says:
[…] You’ve missed some great stuff like printing your digis on to fabric, a glitzy golden tag, watercoloring with Distress Inks and a Shadow Box card. This week’s giveaways (from Mandy, Denise and myself) can still be […]
Linda Citronlime says:
Superb tutorial!!! 🙂
And a lovely card!
Kim H says:
Great tutorial, and a beautifully finished card. I love the colors and textures. The lace, the flowers, and distressing are all wonderful details. Thank you.
lizzie says:
wow miss boss lady you sure do color pretty!!
Calypso says:
Great tutorial Kellie!!! I really love the look of water colored images!!!
Calypso
Corinne says:
Awesome tutorial!! Thanks so much!!
Sharman says:
Awesome job. I have never water colored before but this is a awesome tutorial to start with. Thank You.
Donna says:
Great tutorial Kellie,
Thanks for doing this, I love to water color, especially with the distress pads, so much fun and so many colors can be achieved!!
Thanks
Donna
Arabella says:
Great tutorial Kellie! Thanks! I wondered how people were doing this technique!
Arabella
Sheila says:
Wow Kellie! That is awesome.
Sheila
http://2pawprints.blogspot.com
Leah Martin says:
Love water coloring!
Jess Marin says:
I just love Kellie’s tute. I used it for my first time with DI and it was very helpful.
Thanks Kellie!
Jess M