
I have a problem.
I admit it.
I am completely in love with these little colorful Dew Drops by Memento! They don’t take up a ton of space but you can get a ton of colors! As a result they have been growing faster than tribbles on a space station in my stash (I have a Trekie hubby lol) with no good place to put them that was easy to get to and didn’t keep falling over. The other problem I have is seeing things in the Target clearance section and assuming that I can do something with that. Luckily this time my two problems solved themselves 🙂 I bought this Condiment Caddy about a year ago thinking to put the $1 bin tins in it but they were too big for the basket. So it sat. And sat.
And sat.
I couldn’t figure out what to do with it with that basket on there. Then my hubs says, “why don’t you just cut it off?” WhaaaaAAAAaaat? from that this idea was born.
All you need to make your own is your own condiment caddy, I like the pole in the center for added stability, 2′ x 2′ piece of thin wood, Glue (make sure its a type that can glue plastic to wood, I used Goop), 4 PVC pipe parts that fit around your pole in the center these are called “PVC Schedule 40 Bushing 1.25″/.50″” , White Spray paint.

First thing we had to do was to take it apart to get the main section off of the basket section. Then my hubs had to make good on his thought of “just cut it off” with our Dremel.

Then gather all your parts together. Use the main base to trace out 4 circles on your wood then one smaller circle to go in the bottom. Then cut them out with a jig saw, sand down any rough edges and drill holes in the center big enough to accommodate the center pipe.

Next you are going to build up your shelves by making a wood and pipe sandwich. Glue the smallest circle to the bottom then glue your first Bushing to the wood, then glue your first full sized circle to the bushing… etc etc until all your shelves are done. Then let it dry overnight so the glue fully sets. After it sets then you can spray paint your creation.
After its all sprayed and dry just reassemble the lazy susan portion of the condiment caddy and…
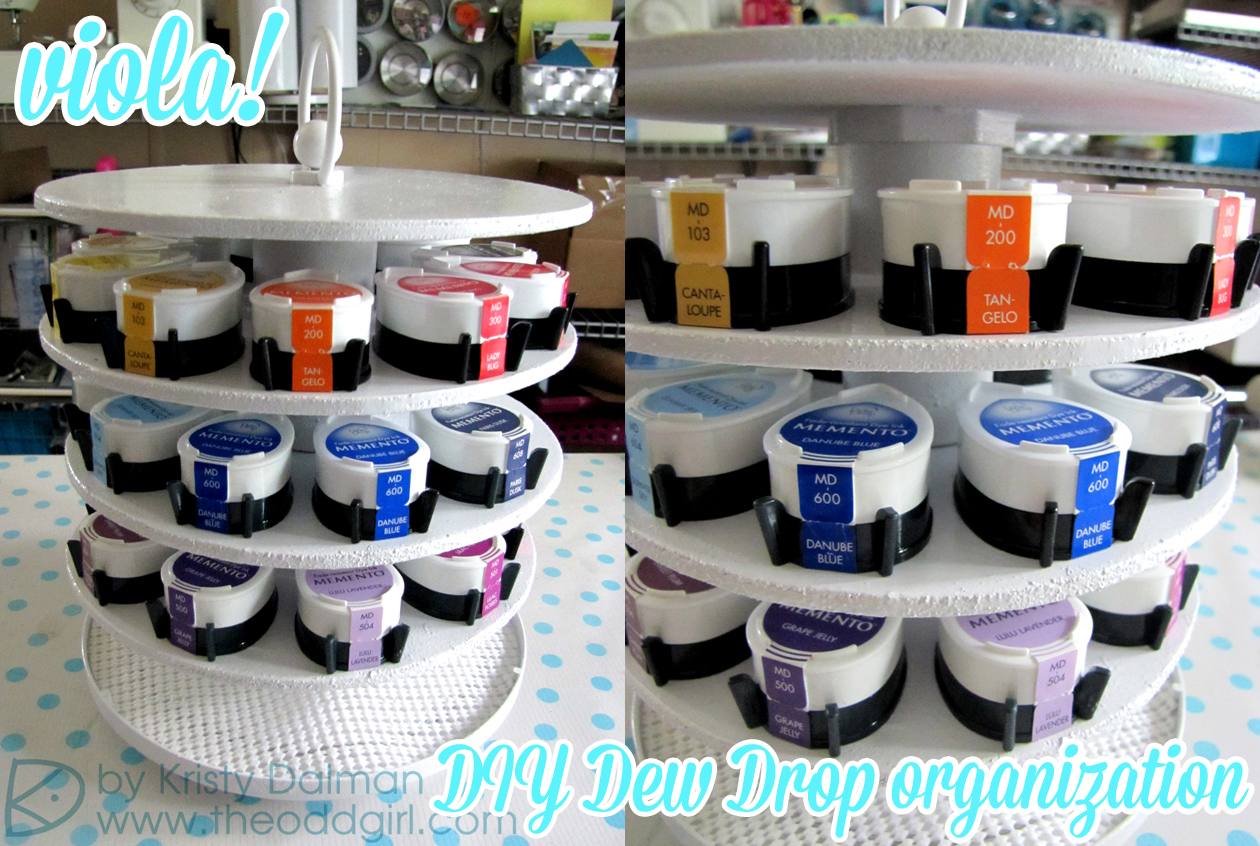
At the end you’ll come out with 5 shelves that are the perfect sized for the dew drops! You can fit 12 on each shelf so 60 in all. I don’t nearly have 60, only 26, so there’s still a lot of room to grow. With the awesome end labels you can easily see what each color is then you can spin it to find what you need.
Besides the cost of the caddy, I think I spent about $14 ($3 for the wood, $4 for the pipes ($1 each), $4 for the spray paint, $3 for the glue) which is a price happily paid to make these little jewels of color accessible!
I hope that gives you some ideas! What homemade storage solutions have you made?


Sara Schumann says:
Awesome idea Kristy! I have an old table lamp that I hang embellishments and cling stamps from with ornament hooks off of the skeleton of the lamp shade. I also have a matching floor lamp that still works and I use it for my ribbon pieces. The lamp has several flourishes that I use for hooks. I hook keychain rings with safety pins filled with ribbon clipped on and hooked over the flourishes.
Sue D says:
Very creative idea–mine are just thrown in a drawer. I did turn a poker chip carousel into a marker holder.
Andrea says:
Way cool! I have a mini mister stand that I made out of bent metal, similar to a test tube holder. I love it because they’re all right there and ready to use!
jessica says:
Shut the front door!!! This is AWESOME!!!! What a cool storage solution!!! Thanks for sharing a GREAT idea!!!
Lynda says:
Super fun caddy!!!
Sandra says:
what a great idea! ( Tribbles) Lmao… I happen to love all thing Star Trek thanks to my Trekie dad… Now I just need someone to build one for me! hehe
Anita A says:
Cool idea! I am not a Trekie but live on Warp Dr. I need my dad to build me one for Christmas.
Judy B says:
Wow Kristy, you are super handy. Love this great storage solution!
Ruza says:
This is super cool!!! I saw that someone altered a Spice Rack about a yr ago. I had one that was not being used so I emptied all the dried up spices, gave them a good washing, painted the actual Spice Rack, and then organized some of my button and all of my brads with the spice contains. It sits on the corner of my craft table, and I love having it at my fingertips!
Kimberli Sarsfield says:
Kristy–You are one innovative gal! First, you used the vintage rolodex for your stamps and now this (and I had my mom make me a copic bag using your dimensions!) Thank you for thinking outside the box and showing us a perfect storage solution!
Amy O says:
So nifty! My hubbie would just roll his eyes at me and insist there was a better use of my time. I love that yours helped out!
Grace says:
omg!!! what a great idea!!!
Rae Ann says:
This is stinking adorable! My hubby always tells me, “Just get it. It will turn up in something!” I love how your “something” turned out!
Colleen says:
What a fantastic idea, I just love those little ink pads to and I just have them in a plastic shoebox now and of course the one I need is always on the bottom. Thanks for this really nifty idea, now all I have to do is make one 🙂
Billie A says:
What a creative and wonderful idea. I hate not having the storage i need for things and this is a wonderful idea. Thanks for all the photo shots and details.
Liz O says:
Awesome idea!! I am alway lurking at the clearance sections of many stores and end up with a pile of “I will repurpose you one day” LOL, your idea just inspired me to see what I can create from my pile!!!
TFS
Have a wonderful day!
Carly Jo says:
This is great! I use a baby food jar that I picked up at walmart for 7.00 one day and I love it!
Annette says:
Fantastic idea Kristy, thanks for the tutorial! Take careX:)
Sheila says:
Very inventive! I use a cassette holder to store my ink pads in. Stole the idea from someone. 🙂
Loz ♥ says:
this is a great idea! anything that make my desk look tidier is a def must have – if only I had all those inks to go on one! 🙂
Laura Karaba says:
You are SO clever! Fabulous idea! (Thanks for the chance to win free stuff to feed my papercrafting addiction!)
Carly W says:
SENSATIONAL! Wow you’ve got me in a spin LOL! this is amazing!
very inventive … now I had better get my thinking cap on for some storage solutions myself.
xoxox Carly
Lucianna says:
I love how that turned out, so organized 🙂
Lani says:
Great idea!! Love it!
Lizzie O says:
you get all man crafty with all the wood working you do. It’s amazing!!!!
10 Ways to Organize Ink | Hydrangea HippoHydrangea Hippo says:
[…] Make a Custom Spinner – someoddgirl did just […]
Rubi says:
Awesome!